Resources for the global digital safety training community.
Gender-Based Risk Model
Credits Last Updated 2017-06
In this session, you will lead participants through a process of first identifying the specific risks they face, both as women and as human rights defenders, and then designing an individual security strategy that addresses these risks.
ADIDS Element
DeepeningParent Topic(s)
Security Plans and ProtocolsDuration
45-60 minutesThis session should be attributed to Jennifer Schulte, as developed in consultation with the UNESCO resource “Manual de Gestión del Riesgo de Desastre para Comunicadores Sociales” and adapted for the Institute for War & Peace Reporting resource “Cyberwomen: Holistic Digital Security Training Curriculum for Women Human Rights Defenders”, under a Creative Commons Attribution-Share Alike 4.0 International CC BY-SA 4.0 License
Materials to Prepare:
- Pens and pencils
- Colored Markers
- Flipcharts or whiteboard/blackboard
Trainer’s Note
This session can be delivered a few different ways:
- Cover the entire session at the beginning of the training, with Part 3 towards the end after you’ve covered more specific tools and practices in earlier sessions;
- Lead participants through Parts 1 & 2 of the session near the beginning of your training, and then deliver Part 3 towards the end after you’ve covered more specific tools and practices in earlier sessions;
- Split the session into 3 individual mini-sessions with Part 1 near the beginning of your training, Part 2 around the midpoint once participants have had the chance to discuss digital security in their personal contexts, and Part 3 towards the end after you’ve covered more specific tools and practices in earlier sessions;
- This session can be applied to both personal or organizational contexts, which is useful if a training is working with members of one collective or organization of WHRDs.
- This session involves a detailed discussion of personal risks through the lens of a women human rights defender context - especially by Part 3 (in particular if this session is done all once, and not split into separate parts) it is likely that participants may begin to appear concerned or stressed. Therefore, it becomes extremely important for you as the trainer to manage the level of stress in the room. Make sure that at frequent intervals you remind the group that this session is ultimately focused on identifying strategies, tools, networks or allies that can help them to face risks; you don’t want them to be or feel scared, there are lots of actions that they can take to fight online violence.
Running the Session:
Part 1 – Identifying Risks & Probabilities
Step 1 | Start the session with a group discussion about the specific risks that women human rights defenders have faced, or can potentially face – remind the group exactly what is meant by the word “risk”: the possibility of something happening which could cause damage or injury. Write down some of the specific examples of risks shared by participants – review these once you have an adequate number of them written down.
Step 2 | Turn the discussion towards the dynamic nature of risk – the probability of a risk occurring fluctuates depending on a number of external factors, increasing and decreasing in likelihood as these factors become more or less present – for example:
- The risk of a text message being intercepted by an adversary increases when using a regular SMS app, but decreases if it is sent encrypted over an app like Signal;
- Likewise, if someone is a targeted activist in their country, the risk of that text being intercepted is greatly increased if it is sent over a regular SMS app on a phone that is connected to their country’s cellular network, but greatly decreased if sent using an app like Signal while on a cellular network in a foreign country;
The above is a simple example of how external technical factors can impact the likelihood of a risk, but what about gender as a factor of risk? Are the risks faced by women human rights defenders the same as those faced by human rights defenders who don’t identify as women?
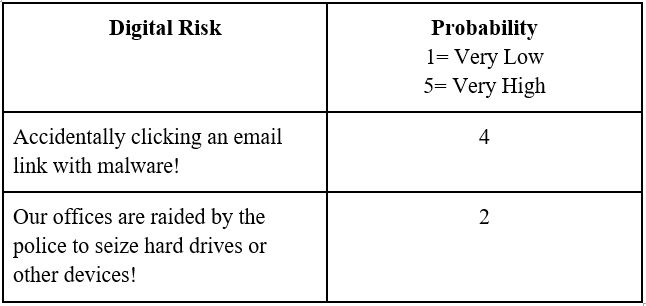
Step 3 | Draw a table like the one below on a large piece of flipchart paper, and list out a number of digital risks under the “Digital Risk” column, using the different risks discussed and shared in Step 1 as examples (be sure to leave room on the right side to add additional columns for later parts of this session):

Step 4 | Once you’ve finished the above list, you will now work together with participants to identify for each risk the probability that it could become a reality – this is easier to do if your participants all come from a similar, shared context (country, type of activism, etc.); if there is a very wide variance among participants’ backgrounds, you might want to offer a hypothetical “persona” as a working example for this part of the session.
Step 5 | To measure these risks’ probabilities, you can formulate a scale. For example, you could use a simple scale of 1 to 5, where 5 equates to a “Very High” probability that the risk could become real and 1 is a “Very Low” probability.
Which number can be assigned to each risk? You can start to fill the table out for the group as you discuss each risk individually, so it begins to look something like this:
Part 2 – Determining Impacts
Step 6 | Now that you have worked with participants to identify example risks and have established a simple system for assigning probability to each, explain that you will now move on to the next step – determining the actual impacts of these risks, or what the outcome would be to an individual, organization, network, etc. if a given risk were to become reality.
Step 7 | Explain that, like the risks themselves, impacts are also quite dynamic – the exact nature of an impact and its severity are similarly contingent upon a number of external factors. Would the impact have implications on a personal level, or an organizational level? Maybe it has implications on both, and if so, how similar or different are those respective impacts?
Step 8 | For this next part of the session, you will be creating a scale to measure impact – this can be another quantitative (numerical) scale similar to the one that was used to measure probability, or it can be qualitative (descriptive) scale that describes the precise nature and detail of an impact. The choice is up to you and the participants – what is important is that this session highlight specific risks and outcomes in a way that facilitates participants’ understanding of these as more than just abstract concepts (for the purposes of this session, we will use a quantitative scale).
Step 9 | Explain to the group that an important part of understanding and measuring a risk is to also anticipate how one might react to its impact - ask participants about how they would likely react on a personal level to a certain risk? Then, discuss how - as with probability and impact - you will also create a scale to measure reaction which can also be qualitative or quantitative (however, again, for the purposes of this session we will use a quantitative scale).
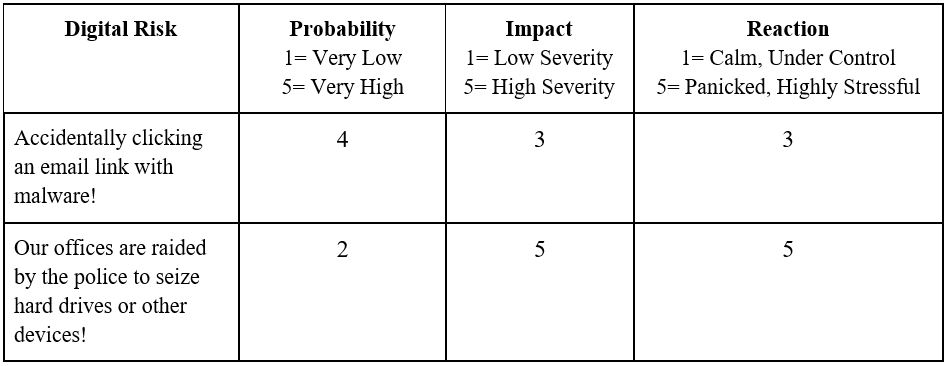
Building off what you started to demonstrate in Step 5, your table should now look like this:
Part 3 – Strategizing Solutions
Step 10 | As was mentioned in the Recommendations, this session involves a detailed discussion of personal risks through the lens of a women human rights defender context - it is likely that participants may begin to appear concerned or stressed by this point. Remind participants that this next part of the session will focus on identifying strategies, tools, networks or allies that can help them to face risks; you don’t want them to be or feel scared, there are lots of actions that they can take to fight online violence.
Step 11 | Now that a probability, impact and reaction has been identified and measured for each risk, explain that this part of the session will address solutions. For each risk, ask participants: What can you do to address a risk and/or prevent it from happening? The answers given by the group are going to be different depending on at which point in the training process you are delivering this session – if it is closer to the beginning, they may not have very detailed answers, but if it’s closer to the end of a training the responses they provide may be much more specifically related to certain practices or tools.
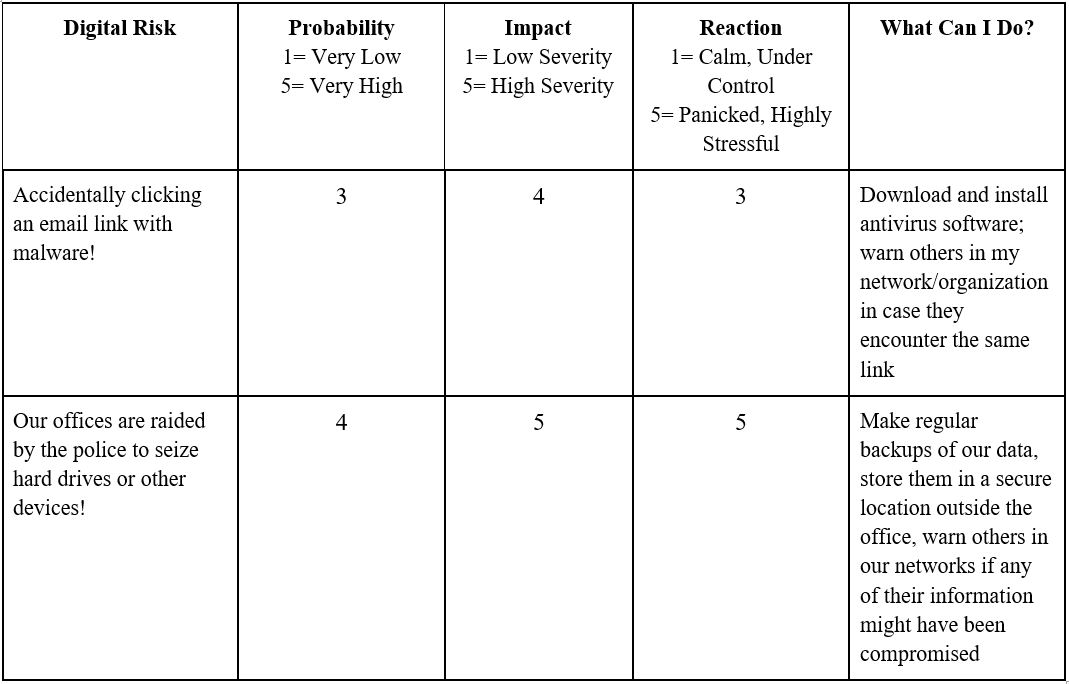
Step 12 | Going back to the table you’ve been working on over the course of the session, make a final column called “What Can I Do?” – under that column, write the answers shared by the group during Step 11. Once complete, keep the table posted visibly in the training room throughout the rest of the workshop so that participants can re-read and analyze their answers. This can help participants determine if anything additional should be added to the table, which can serve as a solid base for designing a digital security protocol.
Here is what the final table should look like: